Pages

Monday, October 24, 2011

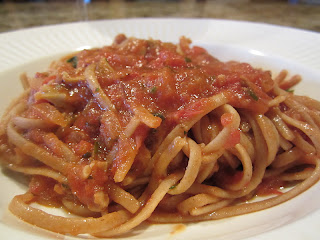
A Great Boating Trip and Linguine with Red Clam Sauce

       Lisa's Dinnertime Dish has moved.  Please visit me at my new and improved blog site!  The new address is http://lisasdinnertimedish.com.  I look forward to seeing you at the new site!!


      Last July my husband Steve and I took a completely impulsive, last minute trip out to California to visit our good friends, Steve and Joan.  So as not to confuse you, my Steve is Steve H and Joan's Steve is Steve A.  Steve H was already on vacation and we had some tentative plans for the weekend, but nothing was set in stone.  So Wednesday morning, Steve A called my Steve just to chat.  He was talking about the great plans they had for the weekend.  He and Joan have a boat and they were going to take the boat up to Santa Barbara for the weekend.  Well....doesn't that sound like fun?  Steve A ended the conversation by saying we should really come out sometime and we had an open invitation.

     After Steve H hung up the phone, we started talking about Steve and Joan's plans and how fun that sounded.  So I just threw it out there and said, "do you think we could get tickets to fly out there tomorrow?"  We went on line and looked and sure enough, we could get two frequent flyer tickets for the next day.  So after a couple of calls to Joan and Steve A and realizing that all the stars had aligned, we booked the tickets and the next evening we were at their house!

    We weren't leaving on the boating trip until the next morning, so we had dinner at their house that first evening.  Joan is a wonderful cook and always makes cooking look effortless.  This particular evening, she went into her pantry and came back with canned clams, a jar of pasta sauce and a box of pasta.  In no time, she had whipped up a very tasty linguine with red clam sauce.  It was a great meal to start off our weekend adventure!  The boating trip was enormously fun and we all had a great time catching up with each other!


This is Joan and me (I'm the short one!)
     I have been wanting to try her recipe since we got back, and finally I made it last night.  It is my take on her recipe, however.  She e-mailed me the recipe and somehow it got lost in cyberland?!  But I think I remembered pretty well how she made it and it turned out pretty tasty.  So here is my version of Joan's Linguine with Red Clam Sauce.  It's a great recipe for a week night because it comes together very quickly.  I made the sauce first and then let it simmer while the pasta water came to a boil and the pasta cooked.


Linguine with Red Clam Sauce

  • 1 lb linguine, cooked according to package directions (I used whole wheat)
  • 2 - 6 oz cans clams, juice reserved (I used whole and chopped them up, you could also used minced)
  • 2 tbsp olive oil
  • 1 small red onion, chopped
  • 1/2 red pepper, chopped
  • 1 cup white wine
  • 4 cups marinara sauce (you can use jarred sauce)
  • 2 tbsp parsley, chopped
  •  Grated parmesan for topping, if desired


Chop your vegetable.  Drain the clams, reserving the juice and chop the clams if whole.


Heat olive oil in a large skillet over medium heat.  Add onions and red peppers and saute until onions are translucent and peppers are softened, about 5 minutes.


Add wine, bring to a boil and let cook a couple of minutes to let wine reduce slighlty.


Add reserved clam juice and let that simmer for a few minutes.


Add marinara sauce and let simmer for at least 10 minutes.


Stir in clams and parsley and simmer just long enough for clams to heat through.


Add cooked pasta and toss to coat with the sauce.


Serve immediately with grated parmesan, if desired.

ENJOY!


Shared at Make Ahead Meals for Busy Moms on 10/24/11

Wednesday, October 19, 2011

I Was Awarded the Liebster Blog Award!!

        Lisa's Dinnertime Dish has moved.  Please visit me at my new and improved blog site!  The new address is http://lisasdinnertimedish.com.  I look forward to seeing you at the new site!!


Well, this week just keeps getting better for me.  I just recieved my second award of the week!
I would like to thank Nonna at Serious Food For the Soul for presenting this award to me.  I am thrilled and honored!!

Please go visit Serious Food For the Soul and check out all of the great things she has going on.

Once again, thank you Nonna, I really appreciate this!


This award is given to bloggers who have less than 200 followers. And now the Rules:

1. Share your gratitude with the blogger who gave you the award by linking back to them.

2. Post the blog to your blog.

3. Reveal your top 5 picks for the award and let them know by leaving a comment on their blog.

4. Bask in the love from some of the most supportive people you will ever have the pleasure to "meet".

5. And, best of all - have fun and continue to spread the love!

 So I pass the Liebster Blog Award to the following 5 blogs:

1.  Everyday Mom's Meals
2.  Not Rachael Ray
3.  A Healthy Jalapeno
4.  Baking Bad
5.  Rich and Sweet

Stop by and visit all of these great blogs!

Chicken Lettuce Wraps, a Healthy Entree

        Lisa's Dinnertime Dish has moved.  Please visit me at my new and improved blog site!  The new address is http://lisasdinnertimedish.com.  I look forward to seeing you at the new site!!


     The inspiration for today's recipe comes from a restaurant that is one of my family's favorites.  The restaurant is Bonfire and it is a local chain here in Minnesota.  We go here fairly often, not only because it's close by, but because they have a lot of variety on their menu, so you can usually find whatever you happen to be in the mood for.

     One of mine and Steve's favorite things on the menu is the chicken lettuce wraps.  They taste really good and it always feels like a healthy choice because there's no bread involved and it's ground chicken and vegetables.  So after much "research" eating them at the restaurant, I started experimenting at home and came up with a pretty good homemade version.

     The chicken mixture is super easy to put together, it's just ground chicken, water chestnuts, garlic and a really simple sauce.  Then to top the chicken I make a lime and cilantro flavored sour cream and a homemade pico de gallo.  If you don't have time to make your own, you can use store bought pico de gallo and this will really come together quickly.


Chicken Lettuce Wraps


     1 lb ground chicken
     1 tsp olive oil
     1 can Water chestnuts – finely chopped
     2 cloves Garlic, minced
     black pepper, to taste
     ¼ cup Soy sauce
     1 tbsp agave (you could also use honey) 
     juice of one Lime

     1 head iceberg lettuce, quartered

For sour cream
    
     1/2 cup sour cream
     2 tbsp chopped cilantro
     juice from 1/2 lime

For pico de gallo

     4 small roma tomatoes, seeded and chopped
     1/4 red onion, finely chopped
     1/3 cup chopped cilantro
     zest of one lime
     juice of 1/2 lime


Chop all of your vegetables and quarter head of lettuce.


Mix soy sauce, agave lime juice and pepper in a small bowl.  Set aside.


Heat oil in a large skillet over medium heat.  Add chicken and break up with a spoon.  Cook until no longer pink. 


 Add water chestnuts and garlic, mix until incorporated with chicken.  Then add sauce mixture and combine. 
Let chicken mixture simmer while you make sour cream and pico de gallo.


Mix sour cream with cilantro and lime juice until well combined.


In a bowl, combine tomatoes, onion, cilantro, salt and pepper and lime zest and juice.


Serve each person a lettuce quarter, along with the chicken and toppings.


ENJOY!


Shared on This Chick Cooks on 10/19/11
Shared on Everyday Mom's Meals on 10/23/11

Tuesday, October 18, 2011

Lisa's Two Bean Chili

        Lisa's Dinnertime Dish has moved.  Please visit me at my new and improved blog site!  The new address is http://lisasdinnertimedish.com.  I look forward to seeing you at the new site!!


      I have been in the kitchen cooking since I was a young girl.  It's something I've always enjoyed.  I was probably about 10 when I started making chili.  It was my mom's recipe and was pretty simple and didn't have a lot of ingredients. But even back then, I felt a need to tweak recipes and make them my own.  So I would try and jazz up her recipe with different spices.  And as a 10 year old, there wasn't a lot of rhyme or reason to the spices I chose to put in. 

     My most memorable batch of chili was one where things went totally awry.  I was at the stove, stirring away, adding spices....and reading a book at the same time (I was a book worm).  Well, the whole reading the book thing was NOT a good idea.  For some reason, I thought the chili needed celery salt and so I'm shaking away with the container....and not paying any attention (I had a good book, remember)....which was bad because the shaker top fell off and a whole PILE of celery salt went into the chili.

     Since this was actually supposed to be my family's dinner, it was not a good thing.  So my mom got involved at this point and we're both trying to scoop the celery salt out of the pot.  But of course, I'd already stirred some of it in, since I wasn't actually watching what I was doing.  We did what we could, we tried to doctor it up so that it would be edible.  Needless to say, it was awful!  We definitely had to go to plan B for dinner that night.

     The recipe I use today is still based on that chili (but no celery salt).  Over the years I've added a few more ingredients to update the recipe, but it still reminds me of that long ago chili.  My family really loves this recipe, too.  They're always very excited for dinner when they know this is on the menu.


Lisa's Two Bean Chili


  • 1 medium onion, chopped
  • 3 cloves garlic, minced
  • 1 lb ground beef ( I used 93% lean)
  • 1 tbsp olive oil
  • 1 15 oz can chili beans, do not drain
  • 1 15 oz can black beans, drained and rinsed
  • 1 28 oz can crushed tomatoes
  • salt and pepper
  • 2 to 3 tbsp chili powder (depending on how spicy you want it to be)
  • 1 tbsp ground cumin
  • 1/8 tsp cayenne pepper (more if you want it spicier)
  • 1 tsp dried oregano
  • sour cream, shredded cheese, chopped cilantro - optional for garnish


Get your onion and garlic chopped


Heat oil in large skillet over medium high heat.  Once hot, add ground beef and start breaking it up with a spoon


Once the beef is broken up and is starting to brown, add the onion and garlic.  Continue cooking until beef is cooked through and the onion is soft and translucent.  Lightly salt and pepper the mixture.


Add both beans and the tomatoes.


Add spices and combine thoroughly.


Allow to simmer for at least 15 minutes, longer if you have time, to allow the flavors to develop.  Serve with desired toppings.


ENJOY!

Shared at A Healthy Jalapeno on 10/19/11
Shared at Lady Behind the Curtain on 10/19/11

Monday, October 17, 2011

The Versatile Blogger Award - I'm a Lucky Recipient!

        Lisa's Dinnertime Dish has moved.  Please visit me at my new and improved blog site!  The new address is http://lisasdinnertimedish.com.  I look forward to seeing you at the new site!!


     Well, today has been a great day!  I am very honored to have been given theVersatile Blogger award by Everday Mom's Meals.  I am just thrilled, it means so much to me!


The Rules of this Award Are:

1.  Thank and link back to the person who gave you the award.
2.  Share 7 things about yourself
3.  Send it along to 15 other Bloggers and let them know you have awarded them!


Seven Things About Me:
1.  I have known my husband, Steve since I was 13 and he was 12, but didn't start dating him until I was 18.
2.  I sing in a praise band at our church with my husband, Steve and our son, Alex (they both play guitar).
3.  I was a music major in college and I also play the saxaphone and flute.
4.  I have a serious addiction to buying shoes and apparently it's hereditary, because I've passed it on to my two daughters, Nicole and Kelly.
5. I hate doing laundry and so I taught my kids to do their own laundry by the time they were about 13 years old
6.  I love to travel and am always looking for an opportunity to take a trip.
7.  Along with the rest of my family, I have climbed to the top of the Sydney Harbor Bridge.  It was an awesome experience! 


I'm Awarding These 15 Blogs:

     Congratulations to everyone.  I am very happy to be able to pass this award on to all of these great blogs!

Fried Ravioli, a Great Make-Ahead Appetizer

         Lisa's Dinnertime Dish has moved.  Please visit me at my new and improved blog site!  The new address is http://lisasdinnertimedish.com.  I look forward to seeing you at the new site!!


      As you may have figured out by now, I love things that can be made ahead.  It just makes life so much easier.  I especially love make-ahead dishes when I'm entertaining.  That way I can actually enjoy the party myself and I don't get stressed out.

     This fried ravioli is a great make-ahead recipe.  It freezes beautifully and when you want to serve it, you just take it straight from the freezer and reheat it on a cookie sheet in the oven for about 10-15 minutes.  With the holidays coming up before we know it, I like to have a bunch of these in my freezer, so then anytime I need an appetizer, I've got something on hand.

     If you want to make this recipe ahead, the best way to freeze the ravioli is to lay it all out on a cookie sheet and put it in the freezer.  Once it's frozen, transfer the ravioli to a zip-loc bag and put back in the freezer.  By doing it this way, they don't stick together.

Fried Ravioli


  • 1 package refrigerated ravioli (I like to use cheese, but you could use any variety you like)
  • 2 eggs
  • a splash of water
  • about 1 cup Italian style bread crumbs
  • olive oil


Lightly beat the eggs with a little splash of water in a shallow dish.  Add about a cup of bread crumbs to another shallow dish.  Then set up a little assembly line with the ravioli, eggs, breadcrumbs and a plate.


Dip the ravioli in the eggs and then coat with the breadcrumbs.  Set aside on the plate.


Heat about 3 tablespoons of olive oil in a large skillet.  Once the oil is hot, start cooking the ravioli in batches (you don't want to crowd the pan).  Cook for about 2 minutes per side or until browned.  Add more oil to the pan between batches as needed.


If making for later, place cooked ravioli in a single layer on a cookie sheet.


Eat immediately, or freeze on cookie sheet and then transfer to a zip-loc bag.  Reheat in a 350 degree oven for 10-15 minutes, until hot. 
Serve with marinara sauce for dipping.


ENJOY!


Shared at Make Ahead Meals for Busy Moms on 10/24/11
Shared at Everyday Mom's Meals on 11/27/11
Shared at Gooseberry Patch Blog on 11/30/11
Shared at Family Fresh Meals on 12/18/11.