Pages

Thursday, January 5, 2012

Something Sweet for a Day at the Spa

    Lisa's Dinnertime Dish has moved.  Please visit me at my new and improved blog site!  The new address is http://lisasdinnertimedish.com.  I look forward to seeing you at the new site!!

     For the past several years, my mother-in-law has treated all of the girls in the family to a day at the spa after Christmas.  We each pick whatever treatments we want and enjoy being pampered.  After we're done at the spa, we head over to her house and watch a chick flick and have dinner together.  It is always a very lovely day.

     Today happens to be our spa day for this year and my daughters and I are all very excited.  In between our treatments,  there is a room for us to hang out in and just relax with each other, so we like to bring some treats along to snack on.  Of course we need some chocolate, so I thought that chocolate chip mini muffins would be perfect!

      Chocolate Chip Mini Muffins


  • 2 cups flour
  • 2 tsp baking powder
  • 1/4 tsp salt
  • 1 stick butter, softened
  • 2/3 cup sugar, plus 1 tbsp for the top of the muffins
  • 2 eggs
  • 1 tsp vanilla
  • 1 cup non-fat plain Greek yogurt
  • 1 cup semi-sweet chocolate chips


Preheat oven to 375 degrees.  Grease a 24 mini muffin tin.
Combine flour, baking powder and salt.  Set aside.
Cream butter and sugar together until light and fluffy.


Beat eggs in , one at a time.  Add vanilla and beat in.


Add yogurt and beat in.


Add flour mixture 1/3 at a time, combining well.


Fold in chocolate chips.
Divide batter between muffin cups.  Sprinkle each muffin with sugar.


Bake in preheated oven for 15-18 minutes, until golden brown.


Let cool and remove from muffin tin.


ENJOY!


Shared at Baking Bad on 1/6/12.
Shared at Six Sisters' Stuff on 12/7/12.
Shared at Family Fresh Meals on 1/8/12.
Shared at Mandy's Recipe Box on1/10/12.
Shared at Chef in Training on 1/10/12.

Wednesday, January 4, 2012

A Great Tomato Meat Sauce

        Lisa's Dinnertime Dish has moved.  Please visit me at my new and improved blog site!  The new address is http://lisasdinnertimedish.com.  I look forward to seeing you at the new site!!


     I think everyone can agree that no matter what your level of expertise in the kitchen, not everything always goes as planned, right?  Well that's what happened at my house a few nights ago.  For Christmas, Steve had given me this cool tool to make ravioli, so I thought it would be great to give that a try and also make homemade meat sauce.  Everyone but Nicole was going to be home for dinner and Kelly and Steve said they would give me a hand.  Sounds like fun, right?  Well, it was fun, but it took us about 2 1/2 hours or so to make dinner and the ravioli was less than perfect.  It tasted just fine, but my technique left something to be desired!

     I had originally thought that I would write a post on how to make the ravioli.....well not yet.....I need some more practice.  BUT....the meat sauce was delicious and so that is what I can share with you today.  I have to give Kelly credit for the execution of the sauce, she did  a fabulous job.  The recipe is easy to make and doesn't take too many ingredients.  We used a combination of ground beef, crushed tomatoes, shallot, garlic, red wine, basil and parsley.  It is a nice hearty sauce.   It was great with the ravioli, but it would taste great with any kind of pasta.

Tomato Meat Sauce


  • 1 lb ground beef (I used 93% lean)
  • 1 shallot, chopped
  • 3 cloves garlic, minced
  • 1/2 cup red wine
  • 2 cans crushed tomatoes
  • salt and pepper
  • 1/4 cup fresh basil, chopped
  • 1/4 cup fresh parsley, chopped


Chop your veggies


Heat 1 tbsp of olive oil in a large skillet.  Add hamburger and break up with a spoon.


Once meat is broken up, add shallots and cook until meat is no longer pink.  Add garlic and continue cooking until garlic is fragrant.


Add wine and let reduce for a couple of minutes.  Then add tomatoes and combine.  Add salt and pepper to taste.  Allow to simmer for at least 15 minutes and then add basil and parsley.


Serve over your favorite pasta.


ENJOY!


Shared at Miz Helen's Country Cottage on 1/5/12.
Shared at It's a Keeper on 1/5/12.
Shared at Baking Bad on 1/6/12.
Shared at Six Sisters' Stuff on 1/7/12.

Monday, January 2, 2012

Roasted Chicken Breasts with Cherry Port Glaze

        Lisa's Dinnertime Dish has moved.  Please visit me at my new and improved blog site!  The new address is http://lisasdinnertimedish.com.  I look forward to seeing you at the new site!!


     I love how sometimes a plan for dinner comes together so perfectly.  One day last week, I was trying to come up with a plan for dinner.  Initially, I was drawing a blank, so I asked Steve what he thought he would like.  He started throwing out some ideas and when he said bone in chicken, it all came together.  I decided that  we could roast some bone in chicken breasts in the oven.  As far as how to flavor the chicken, my first thought was BBQ sauce, but then I thought it would be even better to make a cherry port glaze.  To round out the meal I made some garlic mashed potatoes and a tossed salad.  It was quite delicious!

     To make the glaze, I sauteed a shallot and then added some port wine, cherry preserves, a little dried thyme and some black pepper.  I simmered it until it reduced into a nice glaze.  Very simple and very good!

Roasted Chicken Breast with Cherry Port Glaze


  • 1 shallot, finely chopped
  • 1 tbsp olive oil
  • 1/2 cup port
  • 1/2 cup cherry preserves
  • 1/2 tsp dried thyme
  • salt and pepper
  • 4 bone in chicken breasts


Preheat oven to 400 degrees.
Heat olive oil in a small sauce pan.  Add shallots and saute until translucent.


Add port and bring to a bubble.  Allow to simmer for a couple of minutes.


Stir in cherry preserves.


Add thyme and black pepper.  Simmer for 15-20 minutes until sauce has thickened into a glaze.


Meanwhile, place chicken on a baking sheet (if you have one, use a baking rack as well).  Season with salt and pepper.  Roast in oven for 15 minutes.


Remove chicken from oven and brush with glaze.  Roast for about another 15 minutes and brush with more glaze.  Roast for about 15 more minutes until chicken is cooked through.


Serve immediately.


ENJOY!


Shared at Food Corner on 1/3/12.
Shared at Lady Behind the Curtain on 1/4/12.
Shared atNewlyweds Blog on 1/4/12.
Shared at Miz Helen's Country Cottage on 1/5/12.
Shared at It's a Keeper on 1/5/12.
Shared at Baking Bad on 1/6/12.
Shared at Six Sisters' Stuff on 1/7/12.
Shared at Everyday Mom's Meals on 1/8/12.

Friday, December 30, 2011

Highlights From 2011

        Lisa's Dinnertime Dish has moved.  Please visit me at my new and improved blog site!  The new address is http://lisasdinnertimedish.com.  I look forward to seeing you at the new site!!


      Happy New Year everyone!  It's hard to believe it's already the last day of the year.  I definitely think it's true that the older you get the faster time goes by....this year seems to have passed by in the blink of an eye.

     While this year has passed by quickly, I realize that there have been quite a few highlights along the way.  Our family was able to take two fabulous trips, one to London and one to Costa Rica.  Both trips made memories that will last a lifetime.  We also had some great family time at our cabin this past summer, which is something that I look forward to every year.

     I have also gotten involved in some things that have fed my creative side.  Earlier this year, I started singing in a praise band with Steve and Alex at our church.  Once I started doing that, I realized how much I had missed performing!  I even managed to sneak onto a couple of songs as a backup singer recording with  Steve's band.  I was also able to feed my foodie creative side by taking a week long intensive cooking class last winter.  It really was a foodie dream come true and I enjoyed every minute of it.

     Finally, starting this blog has been an amazing journey and has really inspired me to bring my cooking to a new level.  I can't wait to see how things evolve in 2012, starting with unveiling my new site.  I can't wait for you all to see it!

     I will end this post with a list of my top 5 posts for 2011.

5.  Beef Stroganof, It's Not Christmas Eve Without It


4.  Lemon Glazed Lemon Poundcake


3.  Another Rediscovered Recipe, Chicken Lasagna Alfredo


2.  Clarity at the Nail Salon, The Perfect Chicken and Rice Dish


And the number one post of 2011......drumroll please......

1.  Pearl's Bars


I wish you all a healthy and happy new year!!!

Pesto Puff Pastry Pinwheels

       Lisa's Dinnertime Dish has moved.  Please visit me at my new and improved blog site!  The new address is http://lisasdinnertimedish.com.  I look forward to seeing you at the new site!!


      I love appetizers that are really quick to make.  This particular appetizer is great because not only is it quick to make, it also calls for ingredients that you can easily keep on hand, puff pastry, pesto and cheese.

     I made this appetizer for Christmas Eve and I have to admit, it wasn't the prettiest appetizer I've made.  But everyone loved them.  There was nothing left on the tray except for crumbs!

    Pesto Puff Pastry Pinwheels


  • 1 sheet puff pastry
  • prepared pesto
  • finely shredded asiago cheese (you could also use parmesan, but asiago is what I had on hand)
  • fresh ground pepper


Preheat oven to 350 degrees.
On a lightly floured board, roll puff pastry out into a rectangle, about 9x12.


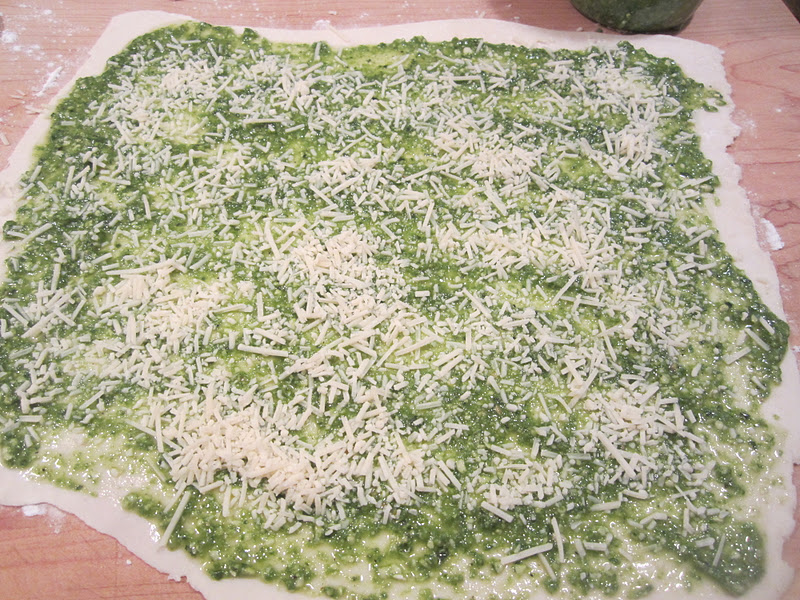
Spread a thin layer of pesto over pastry, leaving about a 1 inch border.


Sprinkle a layer of cheese over the pesto.


Starting from the long end, roll the pastry up into a pinwheel.


Cut into slices about 1/2 inch thick.


Place on a cookie sheet coated with cooking spray.


Bake in preheated oven for 15 to 20 minutes, until lightly brown and crispy.  Serve immediately.


ENJOY!

Tuesday, December 27, 2011

Another Sweet Treat, Crumb Cake

       Lisa's Dinnertime Dish has moved.  Please visit me at my new and improved blog site!  The new address is http://lisasdinnertimedish.com.  I look forward to seeing you at the new site!!


      Last year Steve spent a big chunk of the fall in NYC for work.  One of the last weeks he was out there, he and his co-workers decided that they would stay in a hotel in Hoboken for a change of scenery (ok - they planned a couple of pub crawls over there).  Well, on his last day in Hoboken, he went to Carlos Bakery (Cake Boss) before work and he brought home a crumb cake.  I have to say, the crumb cake was amazing!

     So for the past year, we have thought about this crumb cake and wished that we could just pop over to Carlos Bakery and buy some more.  But, that just wasn't going to happen.  So I was very excited when I was out reading blogs one day and I happened upon a recipe for New York crumb cake at Cats and Casseroles (stop over and check it out, they have a lot of really great recipes).  I just had to give it a try and see if it was close.

     In the end, the crumb cake was absolutely delicious and was close enough to remind us of Carlos Bakery.  I will definitely make this cake again!


Crumb Cake


For topping:

  • 1 cup dark brown sugar, firmly packed
  • 1/2 cup sugar
  • 1/2 tsp salt
  • 1 1/2 tbsp cinnamon
  • 1 cup butter, melted
  • 2 1/2 cups flour
For cake:
  • 2 1/2 cup flour
  • 3/4 tsp baking powder
  • 1 tsp baking soda
  • 1/2 tsp salt
  • 3/4 cup butter, softened
  • 1 1/2 cups sugar
  • 2 eggs
  • 1 1/4 cup sour cream
  • 1 tsp vanilla


Preheat oven to 350 degrees and coat a 9x13 pan with butter and flour.
Prepare topping first.  Combine brown sugar, sugar, salt and cinnamon.  Stir in melted butter.  Add flour, combining well.


Set topping aside.   Cream butter and sugar together.


Add eggs, one at a time, beating in well.


Add sour cream and vanilla and beat in.


In a separate bowl, combine flour, baking powder, baking soda and salt.  Add to wet ingredients, 1/3 at a time, combining well after each addition.


Spread batter into prepared pan.


Crumble topping over the batter evenly.


Bake in preheated oven for 45-55 minutes, until a toothpick comes out clean.


Allow to cool before serving.


ENJOY!


Shared at Six Sisters' Stuff on 12/31/11.
Shared at Food Corner on 1/3/12.
Shared at Miz Helen's Country Cottage on 1/5/12.
Shared at It's a Keeper on 1/5/12.